Yesterday the project I have been working on for close to a year now went live! We have had very minimal issues and apart from working with an Amazing team of Readify people we have made use of an extensive suite of UI Automation and Integration tests.
Our UI Automation suite was originally supposed to simply be ‘Smoke Tests’ which run through all UI processes in our application and makes sure it works end to end, not really asserting much, just that the process worked and the expected result was there at the end.
This grew… we now verify all application logs, have helpers which wait for our message processors to send and receive all messages, then assert everything from audit messages, to financial movements to report data. It has given us amazing confidence in our product and allowed us to go live with maybe a dozen medium priority bugs which has taken us ½ a day to get on top of.
I have started breaking out the framework we built into a CodedUI contrib project which lives in the MSTestContrib project on codeplex (http://mstestcontrib.codeplex.com)
I will be creating a WPF Todo application using the framework, writing my UI Automation tests first, refactoring, making mistakes, improving the code etc. It will be the first time I have used EF, so this whole thing will be a learning experience.
Ready… Go
For the purposes of the demo app, I will simply have an in memory repository. We can always add proper persistence and such later.
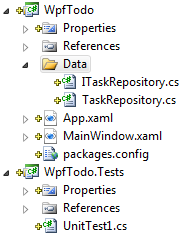
With that basic criteria in mind off I go, I start with two project, WpfTodo, and WpfTodo.Tests.
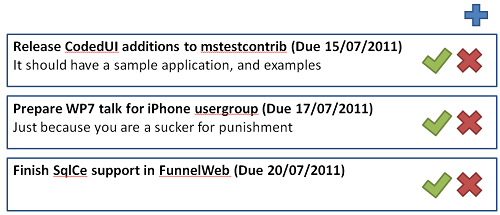
and I want to build something like this:
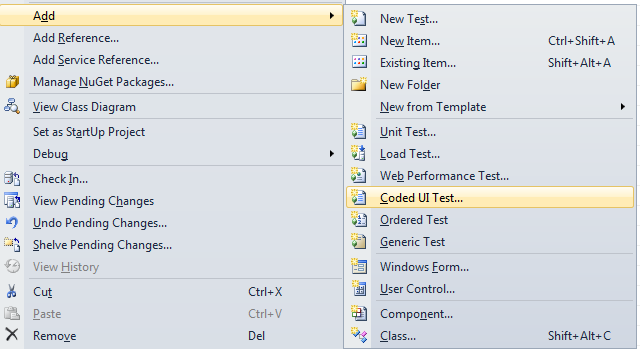
Now I add my first CodedUI test (to add all references and such).
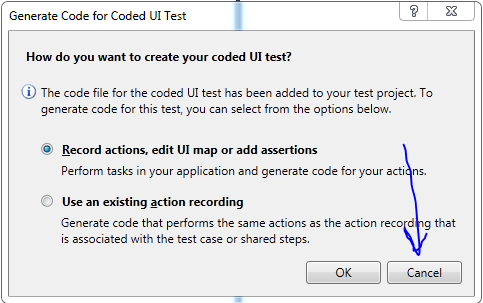
And then I will cancel out of the generate code dialogue because I want to lovingly craft all my UI Automation code so I don’t get bitten when trying to maintain it..
After getting rid of all the generated crap, we are left with:
using Microsoft.VisualStudio.TestTools.UITesting;
using Microsoft.VisualStudio.TestTools.UnitTesting;

namespace WpfTodo.Tests
{
    [CodedUITest]
    public class CodedUITest1
    {
        [TestMethod]
        public void CodedUITestMethod1()
        {

        }
    }
}
Some Setup
Now that we have the CodedUI assemblies referenced it is time to set everything up.
NOTE: If you have resharper, disable shadow copy on unit tests otherwise it makes it pretty hard to run your tests locally.
We start off defining our application, this is a nice bootstrapper to abstract starting our app and handling shutdown. You should use Name, then the name will be the window title.
public class TodoApp : WpfApplicationBase
{
    protected override WpfWindow GetMainWindow()
    {
        return new WpfWindow
                    {
                        SearchProperties =
                            {
                                {UITestControl.PropertyNames.Name, "Wpf Todo List"}
                            },
                        TechnologyName = "UIA"
                    };
    }

    protected override string ApplicationExeLocation
    {
        get { return Path.Combine(Path.GetDirectoryName(Assembly.GetExecutingAssembly().Location), "WpfTodo.exe"); }
    }
}
Now we have our application bootstrapper, we define our CodedUITestBase class which all our tests will inherit from!
public class CodedUITestBase : CodedUITestBase<TodoApp>
{
}
Notice that we are inheriting from CodedUITestBase<T> where T : ICodedUIApplication, new()
It is the job of CodedUITestBase to bootstrap your application. The reason we create your own is so you can extend it.
One more thing is if you use the r# test runner, make sure you compile your test project as x86 otherwise I have found things go a bit strange.
Writing our first test!
When using mstestcontrib to write Coded UI Tests (CUIT’s) our tests will always start with a screen.
If you do not have ReSharper, then skip down to the code
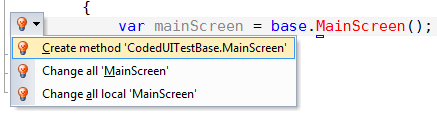

protected MainScreen MainScreen()
{
return new MainScreen(Application, Application.MainWindow);
}
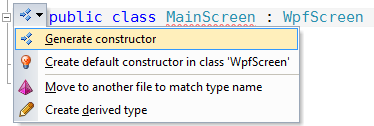
public class MainScreen : WpfScreen
{
public MainScreen(WpfApplicationBase application, WpfWindow window) : base(application, window)
{
}
}
Now move (ctrl + r, ctrl + o) the screen into a Screens directory.
Next we start building our screens up. I want to add a task, it is an action I perform on my main screen, so I will add a method with a few parameters which will end up creating my task for me.
    [TestMethod]
    public void CodedUITestMethod1()
    {
        var mainScreen = MainScreen();

        var newTaskScreen = mainScreen.NewTask();
    }
Get R# or visual studio do generate that method on your MainScreen class, then we can start writing some UI Automation!
public NewTaskScreen NewTask()
{
    var addTaskButton = Window.Get<WpfButton>("AddTaskButton");
    addTaskButton.Click();

    return new NewTaskScreen(Application, Window.GetWindow("AddTask"));
}
There is a few things you may notice with this, I am using a GetMouse.Click(addTaskButton);)
We then return a NewTaskScreen, in the second parameter we find the child/modal window and pass it into the screen.
After a little bit more coding our test looks like this
[TestMethod]
public void CodedUITestMethod1()
{
    var mainScreen = MainScreen();
    var newTaskScreen = mainScreen.NewTask();

    newTaskScreen.Title = "Write some tests";
    newTaskScreen.Description = "for MSTestContrib";
    newTaskScreen.DueDate = DateTime.Now.AddDays(3);

    newTaskScreen.Create();
}
Run the test
Obviously our test will fail, we have not created any UI yet, only our UI Automation Test.
Test method WpfTodo.Tests.CanAddTaskTest.CodedUITestMethod1 threw exception: Microsoft.VisualStudio.TestTools.UITest.Extension.UITestControlNotFoundException: The playback failed to find the control with the given search properties. Additional Details: TechnologyName: ‘UIA’ ControlType: ‘Button’ AutomationId: ‘AddTaskButton’
So, lets create the UI making sure that we AutomationIds to the controls as we go so they will be picked up by the test we have written. I won’t post all the code as you can get at this sample in the MsTestContrib project on codeplex.
<Window x:Class="WpfTodo.View.NewTaskWindow"
        xmlns="http://schemas.microsoft.com/winfx/2006/xaml/presentation"
        xmlns:x="http://schemas.microsoft.com/winfx/2006/xaml"
        Title="New Task"
        Height="300"
        Width="300"
        xmlns:mc="http://schemas.openxmlformats.org/markup-compatibility/2006"
        xmlns:d="http://schemas.microsoft.com/expression/blend/2008"
        xmlns:ViewModel="clr-namespace:WpfTodo.ViewModel"
        mc:Ignorable="d"
        d:DataContext="{d:DesignInstance ViewModel:NewTaskViewModel}">
    <Grid>
        <Grid.RowDefinitions>
            <RowDefinition Height="Auto" />
            <RowDefinition Height="Auto" />
            <RowDefinition Height="Auto" />
            <RowDefinition Height="Auto" />
            <RowDefinition Height="*" />
        </Grid.RowDefinitions>
        <Grid.ColumnDefinitions>
            <ColumnDefinition Width="Auto" />
            <ColumnDefinition Width="*" />
        </Grid.ColumnDefinitions>

        <Label Content="Title: " />
        <TextBox Text="{Binding Task.Title}"
                 AutomationProperties.AutomationId="Title"
                 Grid.Column="1" />

        <Label Content="Description: "
               Grid.Row="1" />
        <TextBox Text="{Binding Task.Description}"
                 AutomationProperties.AutomationId="Description"
                 Grid.Column="1"
                 Grid.Row="1" />

        <Label Content="Due Date: "
               Grid.Row="2" />
        <DatePicker SelectedDate="{Binding Task.DueDate}"
                    AutomationProperties.AutomationId="DueDate"
                    Grid.Column="1"
                    Grid.Row="2" />

        <StackPanel Orientation="Horizontal"
                    HorizontalAlignment="Center"
                    Grid.ColumnSpan="2"
                    Grid.Row="3">
            <Button Content="Create"
                    AutomationProperties.AutomationId="CreateButton"
                    Command="{Binding CreateTaskCommand}" />
            <Button Content="Cancel"
                    AutomationProperties.AutomationId="CancelButton"
                    Command="{Binding CancelCommand}" />
        </StackPanel>
    </Grid>
</Window>
Which looks like this (I will make pretty later:P)
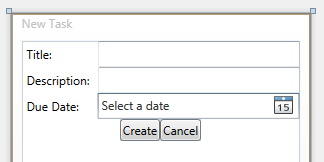
Lets run our test:
Awesome! It has automated our app, and put a task in. The test is still not much use as we are not verifying that our app is actually working. To verify we start off extending out test.
var tasks = mainScreen.Tasks.ToList();
Assert.AreEqual(1, tasks.Count);
Assert.AreEqual(title, tasks[0].Title);
Notice we have abstracted the UI of the lists behind a Tasks collection. Which you can see how the UI is put together below.
One thing to point out is you MUST use a Label not a TextBlock, because the TextBlock has no Automation Peer, and is not discoverable by UIA. ItemsControls also suffer from the same issue.
I will post the source for a UITextBlock control which is a TextBlock with an Automation Peer which allows much nicer formatting. But for now, Label’s will do.
<ListBox ItemsSource="{Binding Tasks}"
                AutomationProperties.AutomationId="TasksList"
                Grid.Row="1">
    <ListBox.ItemTemplate>
        <DataTemplate>
            <StackPanel>
                <StackPanel Orientation="Horizontal">
                    <Label Content="{Binding Title}"
                           AutomationProperties.AutomationId="Title" />
                    <Label Content=" (" />
                    <Label Content="{Binding DueDate, StringFormat=d}"
                           AutomationProperties.AutomationId="DueDate" />
                    <Label Content=")" />
                </StackPanel>
                <Label Content="{Binding Description}"
                       AutomationProperties.AutomationId="Description" />
            </StackPanel>
        </DataTemplate>
    </ListBox.ItemTemplate>
</ListBox>
And finally we fill in the UI Automation code for the Tasks property on MainScreen.
public IEnumerable<Task> Tasks
{
    get
    {
        var tasks = Window.Get<WpfList>("TasksList");
        return from WpfListItem item in tasks.Items
                select new Task
                            {
                                Title = item.Get<WpfText>("Title").DisplayText,
                                Description = item.Get<WpfText>("Description").DisplayText,
                                DueDate = DateTime.Parse(item.Get<WpfText>("DueDate").DisplayText)
                            };
    }
}
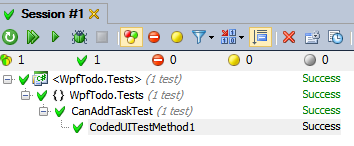
Run our test again, success!
Resources & Source Code
The sample project I built in this post is available from the MSTestContrib project on CodePlex.