Even with all it’s problems ClickOnce is actually a decent option if you want a simple installer and an application which Self Updates.
Creating the ClickOnce installer
I don’t like using the publish feature in VS for my ClickOnce installers, it causes more problems than it solves. I tend to use Mage directly, but this is sometimes not that easy to figure out how to do it. Lets start by creating our installer.
I am using MSBuild as my build platform, but these instructions can be adapted to anything really.
Properties
<PropertyGroup>
  <Version Condition="$(VERSION)==''">0.0.0.1</Version>
  <ClickOnceFolder>$(MSBuildProjectDirectory)artifacts\ClickOnce\</ClickOnceFolder>
  <ClickOnceFiles>$(ClickOnceFolder)$(Version)\</ClickOnceFiles>
  <Mage>$(MSBuildProjectDirectory)tools\mage.exe</Mage>
  <ProviderUrlArg Condition="$(ProviderUrl)!=''">-ProviderURL $(ProviderUrl)</ProviderUrlArg>
  <ClickOnceName Condition="$(ClickOnceName)==''">MarkPad</ClickOnceName>
</PropertyGroup>
<ItemGroup>
  <SourceFiles Include="$(MSBuildProjectDirectory)src\My.App\bin\$(Configuration)\**\*.*" />
</ItemGroup>
The provider URL is so we can embed the installation URL into the installer, this will make ClickOnce work in Chrome and other browsers. Chrome downloads the .application file, then the user runs it from the Downloads folder, at that point ClickOnce has no idea where it was downloaded from, so the install fails.
With the provider url embedded, it will work as expected.
Most of the properties above should be easy to understand what they are for.
Creating the installer
1. Copy the application binaries into a Version folder
<Copy SourceFiles="@(SourceFiles)" DestinationFolder="$(ClickOnceFiles)%(SourceFiles.RecursiveDir)"/>
2. Create the .manifest file for the application
<Exec Command="$(Mage) -New Application -ToFile $(ClickOnceFiles)MyApp.exe.manifest -Processor x86 -name "$(ClickOnceName)" -Version $(Version) -FromDirectory $(ClickOnceFiles) -IconFile icon.ico" />
This creates the .manifest file, which is information about that particular version of the software. It lives inside the folder with all the binaries.
3. Perform updates to manifest (optional)
<Exec Command="powershell.exe -ExecutionPolicy RemoteSigned -NoProfile $(Root)tools\UpdateManifest.ps1 -ManifestFile $(ClickOnceFiles)MyApp.exe.manifest" />
If you have issues with certain assemblies failing the checksum (normally because of native dlls), I have used this code to fix the issue:
Param($ManifestFile)
write-host "Fixing up Manifest File"
write-host $ManifestFile

[xml]$xml = get-content $ManifestFile

$elementsToRewrite = $xml.assembly.dependency | where {$_.dependentAssembly.codebase -ne $null -and ($_.dependentAssembly.codebase.Contains("CefSharp") -or $_.dependentAssembly.codebase.Contains("NHunspell")) }
foreach ($elementToRewrite in $elementsToRewrite)
{
    $fileNode = $xml.CreateElement("file", "urn:schemas-microsoft-com:asm.v2")
    $fileNode.SetAttribute("name", $elementToRewrite.dependentAssembly.codebase)
    $fileNode.SetAttribute("size", $elementToRewrite.dependentAssembly.size)
    $fileNode.AppendChild($elementToRewrite.dependentAssembly.hash)
    $xml.assembly.AppendChild($fileNode)
    [Void]$xml.assembly.RemoveChild($elementToRewrite)
}

$xml.Save($ManifestFile)

write-host "Fixed Manfiest File"
Skip this step by default, introduce if you need it.
4. Sign the .manifest file (optional)
If you want to sign your installer, this is where you do that.
<Exec Command="$(Mage) -sign MyApp.manifest -CertFile $(Certificate) -Password $(CertPassword)" />
5. Create the .application file
<Exec Command="$(Mage) -New Deployment -ToFile $(ClickOnceFolder)MyApp.application -name "$(ClickOnceName)" -Processor x86 -Install true -Version $(Version) -Publisher "Your Company" -AppManifest $(ClickOnceFiles)MyApp.exe.manifest $(ProviderUrlArg)" />
This generates your deployment
7. Update your deployment settings (optional)
<Exec Command="powershell.exe -ExecutionPolicy RemoteSigned -NoProfile $(Root)tools\UpdateApplicationManifest.ps1 -ManifestFile $(ClickOnceFolder)MyApp.application" />
The powershell script looks like this
Param($ManifestFile)
write-host "Fixing up Manifest File"
write-host $ManifestFile

[xml]$xml = get-content $ManifestFile

$xml.assembly.deployment.SetAttribute("trustURLParameters", "true")
$xml.assembly.deployment.SetAttribute("mapFileExtensions", "true")

# Uncomment to tell your app to update before startup
#$xml.assembly.deployment.subscription.update.RemoveAll()
#$updateNode = $xml.CreateElement("beforeApplicationStartup", "urn:schemas-microsoft-com:asm.v2")
#$xml.assembly.deployment.subscription.Item("update").AppendChild($updateNode)

$xml.Save($ManifestFile)

write-host "Fixed Manfiest File"
This is where you can change when you want your app to check for updates, and modify deployment settings. More information about this file available at http://msdn.microsoft.com/en-us/library/k26e96zf.aspx
7. Sign your deployment (optional)
<Exec Command="$(Mage) -update MyApp.application -appmanifest MyApp.manifest -CertFile $(Certificate) -Password $(CertPassword)" />
This signs your deployment.
8. Rename binaries to have the .deploy extension
<ItemGroup>
  <DeploymentFiles Include="$(ClickOnceFiles)**\*.*" Exclude="$(ClickOnceFiles)MarkPad.exe.manifest" />
</ItemGroup>

<Move SourceFiles="@(DeploymentFiles)" DestinationFiles="@(DeploymentFiles->'%(RootDir)%(Directory)%(FileName)%(Extension).deploy')" />
This is so webservers will serve all the files, some extensions will not be served on some web servers, this gets around that issue.
To see it all working together, check out MarkPad’s build script at https://github.com/Code52/DownmarkerWPF/blob/master/Markpad.msbuild#L31
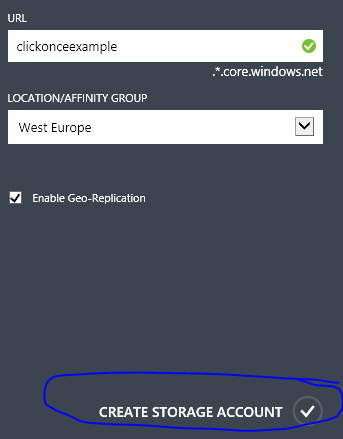
Deploying to Azure
Setup a storage account

Once created, go to the containers tab, then add a new container.

Make sure you choose Public Container as the access level, otherwise things will not work!
Uploading deployment to Azure Storage
For this I use a utility from the Azure team called AzCopy. See the blog post at http://blogs.msdn.com/b/windowsazurestorage/archive/2013/04/01/azcopy-using-cross-account-copy-blob.aspx and download it from http://go.microsoft.com/fwlink/?LinkId=287086
Upload steps
<!--$(BlobTargetUrl) = https://myaccount.blob.core.windows.net/mycontainer/ -->

<!--Upload everything except the application manifest as it should be done last (once everything else is uploaded)-->
<Move SourceFiles="$(ClickOnceFolder)MyApp.application" DestinationFolder="$(ClickOnceFolder)ClickOnceApplicationFile\" />
<Exec Command="$(Root)tools\AzCopy.exe $(ClickOnceFolder) $(BlobTargetUrl) /destkey:$(BlobTargetKey) /S /V /Y" />
<Exec Command="$(Root)tools\AzCopy.exe $(ClickOnceFolder)ClickOnceApplicationFile\ $(BlobTargetUrl) /destkey:$(BlobTargetKey) /S /V /Y" />
What we are doing here is moving all the files, except the .application file, and uploading them first. Then finally uploading the .application file once all the other files are uploaded. This is so you do not have a corrupted installer while you are uploading the new version.
Install from Azure
Now you just point at the .application file, for example MarkPad’s nightly is available from http://ginnivan.blob.core.windows.net/markpadnightly/MarkPad.application
Hope this helps you out, I have found this is a really cheap and easy way to get ClickOnce installers out there!